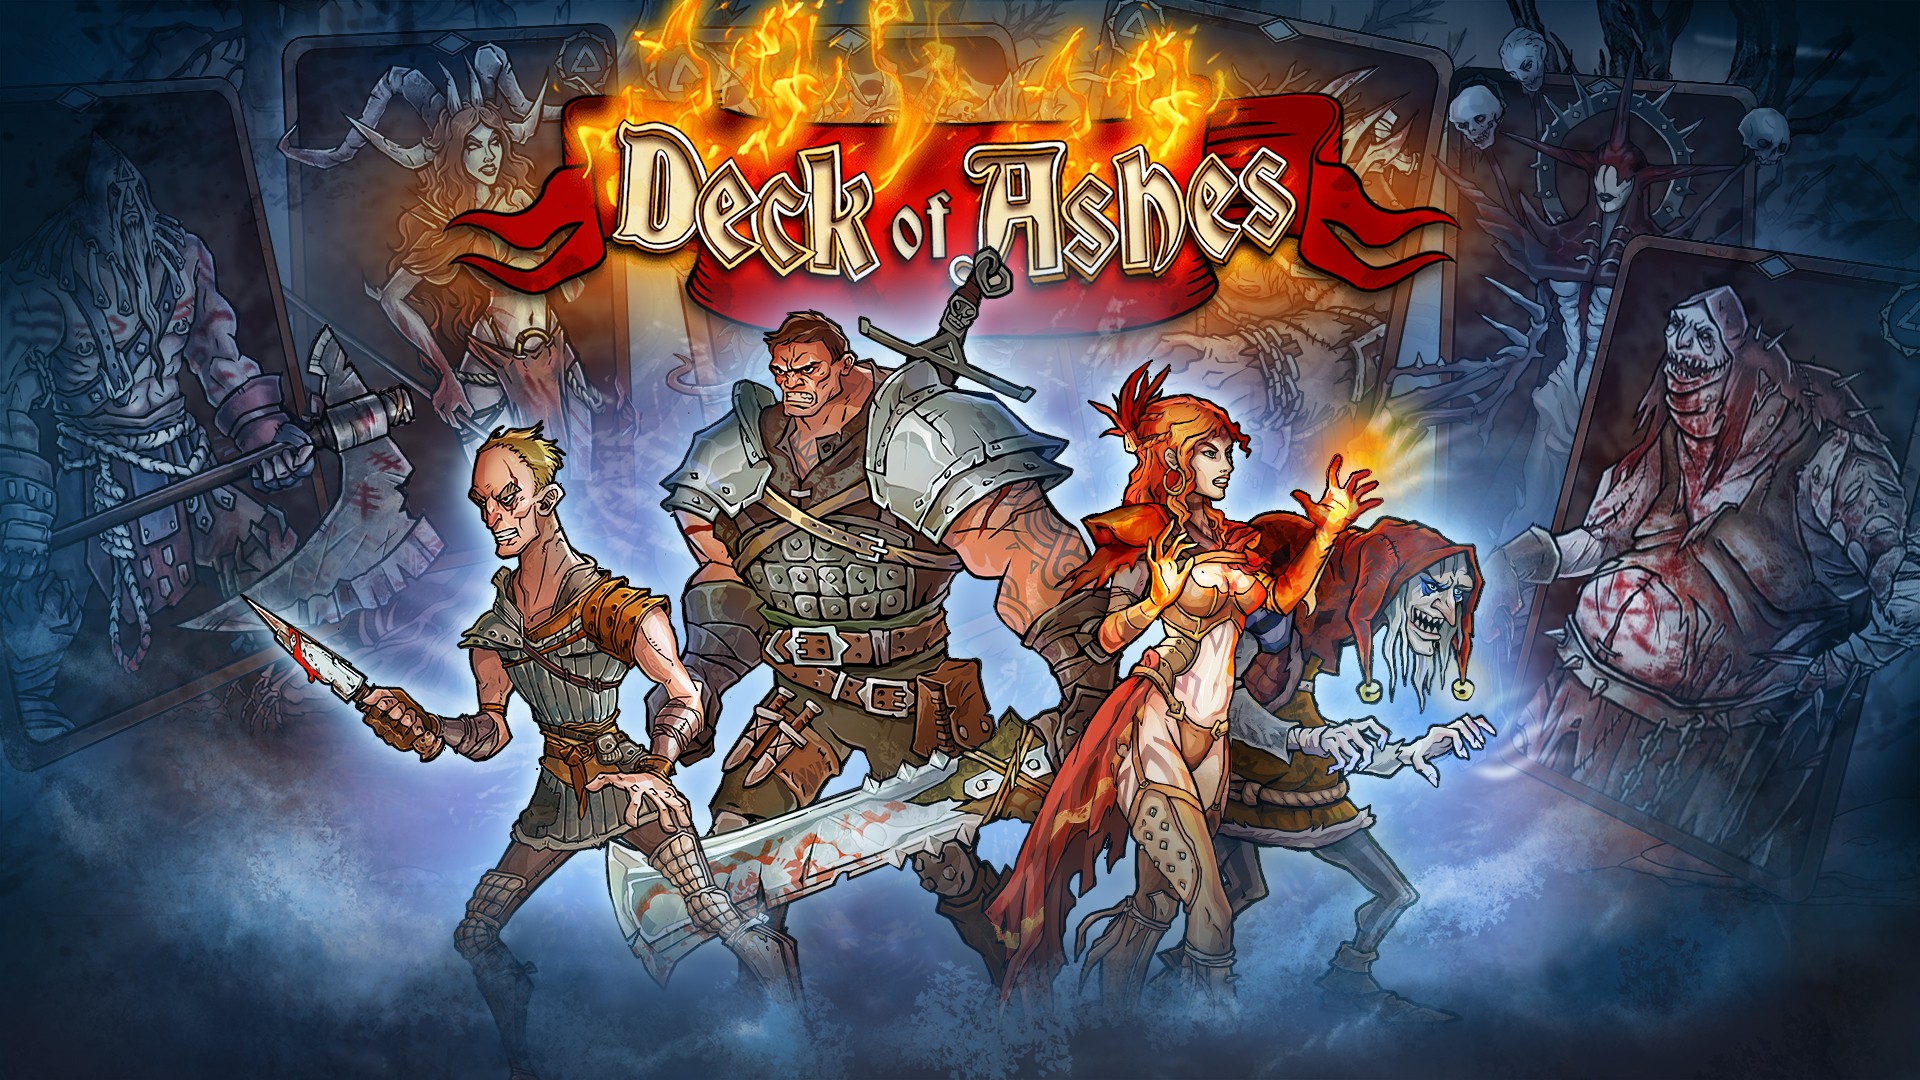
Deck of Ashes is a deckbuilding rogue-like released on June 9, 2020 on Steam, after spending just over a year in Early Access. The first game from Russian studio AYGames, Deck of Ashes takes place in a world recently ravaged by the Ash Curse, mutating most life into aberrations and destroying the established civilization, all unleashed upon the land by four outcasts attempting to gain ultimate power from Lady Death herself. You play as one of these four outcasts attempting to return to the mountain on which Lady Death resides, so that you may defeat her and restore the world from her curse.
The main mechanical difference DoA has from other deckbuilding roguelikes is, in fact, the titular Deck of Ashes (which I’m going to refer to as the Ash Deck, or AD, in the rest of the review). The AD is your discard pile – but fret not, there’s a bunch of cards that have “Ash” effects on them, which only come into play when they’re in the AD. Furthermore, your AD doesn’t automatically re-shuffle into your Battle Deck (your draw pile, BD in the rest of the review) when you’re out of cards – instead, a card called Ash Pact creates itself, which you must pay for with health points in order to “renew” a random portion of your AD into playable cards.
In the early game, you’ll almost always want to use the Ash Pact right away to renew your limited number of cards. But as your deck grows, you’ll gain cards that renew cards from your AD on top of their other effects, and you’ll also increase your number of Ash cards that do their best work when discarded. Ash cards are often difficult to get rid of when they’re in your hand, and the Ash Pact isn’t picky about which cards it renews – you might be better off waiting, taking a little more damage, risking another turn, before you take a chance on the Ash Pact and get cards back into your Battle Deck.
Does this sound complicated yet? Don’t worry, it will soon.
Mechanics, Part 1 – The World
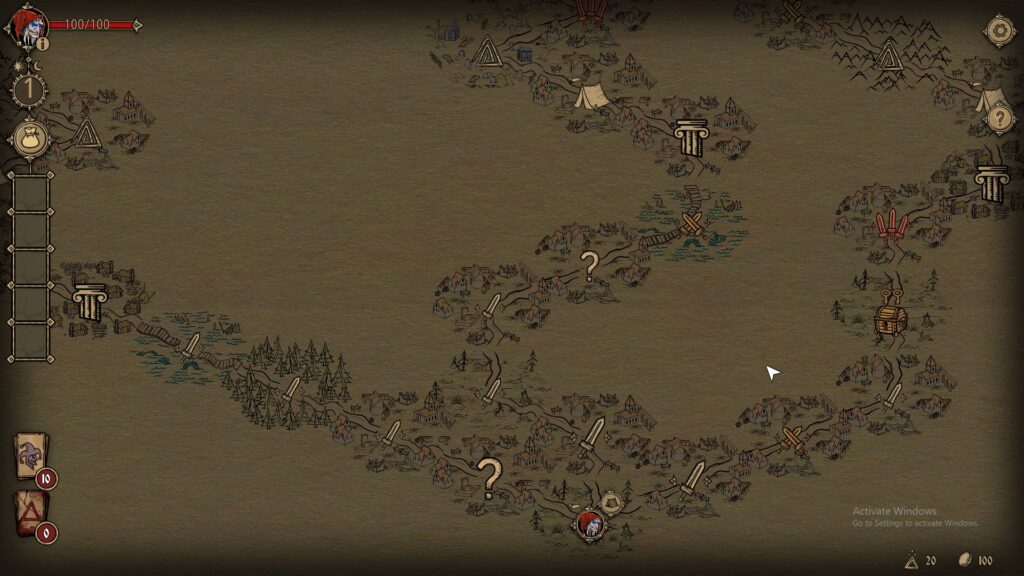
In the Campaign game mode for Deck of Ashes, you play as one of the four Outcasts who initially ventured into the Valley of Death to secure the Ash Box, an artifact of immense power. Each Campaign is divided into three main chapters, plus the final boss chapter at the end where you’ll fight Lady Death. Each of those main chapters takes place in a different “Realm,” a map of connected points that is overseen by a “Ruler” – the big boss for the Realm. Each Realm is themed, so in one run you may start in the Human Realms, overseen by the corrupted King Octavius, then journeying into the Forbidden Grove, ruled with a mighty jaw by the Mutated Ancestor, then on to the Dire Marsh, slick with ooze from the Primordial Miasma, before reaching the gate of the Valley to finally confront Death herself. Each Realm is bigger than the last, offering greater rewards the further you get away from your Camp, always a beacon of light in the center of the Realm.
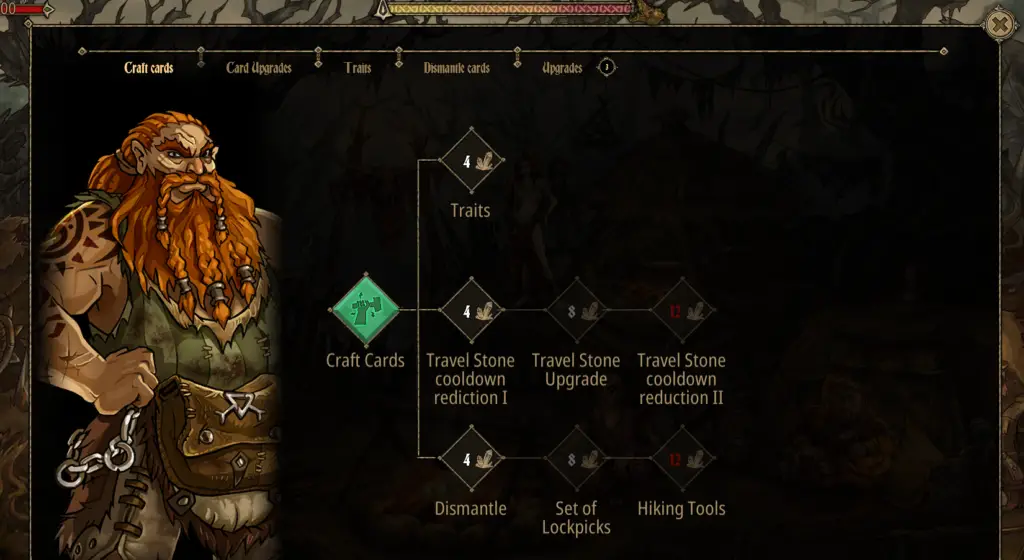
You start each Chapter at Camp, your home-base during your time in each Realm. Here is where you’ll find the four NPCs in the game: The Ash Master, the Blacksmith, the Herbalist, and the Merchant. The Ash Master can renew your cards for you and cast the Resurrection Rite, the Blacksmith helps you craft cards, upgrade them, or take them apart, the Herbalist can heal you for a price or remove Ailments, and the Merchant sells card recipes and consumable items.
At the top of the Realm screen is a bar with an arrow starting at the left, and a little icon of the Ruler at the right. Each move you make around the Realm takes one game-time hour. Generally, you get 72 moves-worth of action in a Realm before the Ruler “finds” you, sending you back to Camp to prepare for the final confrontation, which starts immediately after you leave Camp again.
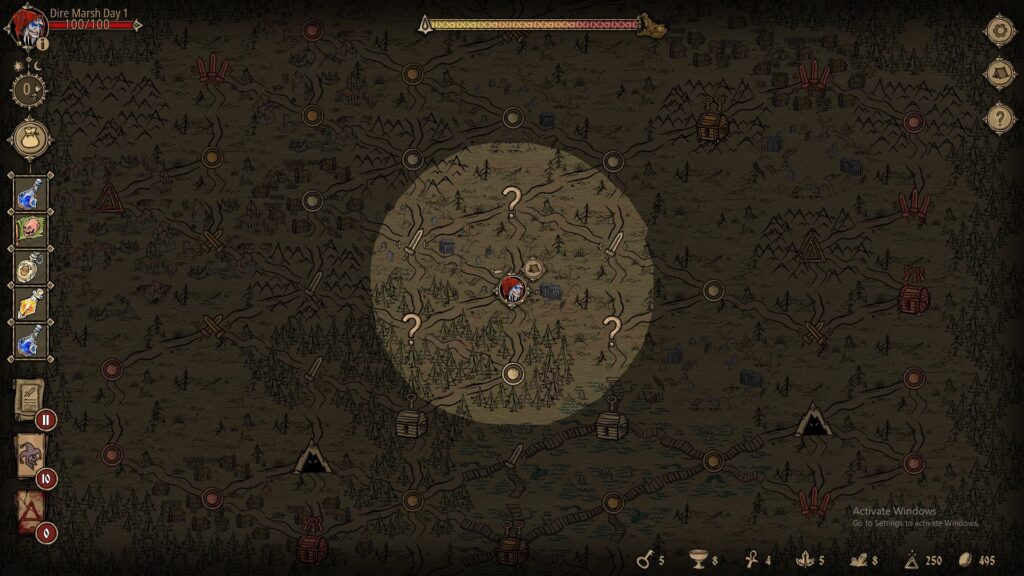
The non-Camp map points – which I’m going to call tiles even though they’re not quite tiles – in the Realm either contain Battles, Events, Resource Points, Chests, Portals, or a Dungeon. Let’s break all those down.
Battle tiles are represented by sword icons, with one sword representing an easy battle and three swords representing a difficult one. Battles are the most reliable way to get Ash and Gold, and the only way to get Keys, which you use to unlock Chests.
Event tiles are represented by a question mark icon, and include a little fluff text followed most regularly by a buff or a debuff applied to your character. Sometimes you’re asked to make a choice, which often involves gaining resources at the cost of gaining a debuff, or gaining resources at the cost of starting a fight. Moving into an Event tile can sometimes prompt a fight immediately in an ambush. Occasionally, you’ll encounter one of the Camp NPCs on an Event tile, but the benefit of this is just that they’re near you instead of at Camp – they still charge full price for their services
Resource Points are otherwise-empty tiles that can be “mined” to extract the NPC resources – Goblets, Relics, Herbs, or Ore – becoming depleted for the rest of the Chapter once you’ve extracted them. Extracting resources takes one game-time hour, and empty Resource Points can turn into Battles and Events as time goes on.
Chest tiles contain treasure chests that must be opened with Keys – each Chest icon on the Realm map shows how many keys it will require. Chests always contain Gold and a card Recipe of variable quality, and sometimes a consumable item. Huge alert here – the only way to get cards in the Campaign mode is to acquire Recipes and craft them using Ash.
Moving to a Portal tile allows you to warp to one of the other Portal tiles on the map – these are always on the edge of the map, and are useful when you feel confident in your deck and your ability to fight off any monsters.
Dungeons are micro-Realms that you can enter once you’ve moved on to the Dungeon Entrance tile. The tiles in Dungeons are actually hex tiles, allowing you much freer movement around the Dungeon. Dungeons contain battles like on the surface, but Events are replaced with Traps/Altars, which damage you and debuff you or heal you and buff you, respectively. Dungeons are full of quality chests, but no chest in the Realm is as good as the chest just past the Lord of the Dungeon, a powerful miniboss. The Boss Chest always contains an epic card recipe and a solid chunk of gold, so completing the Dungeons in each Realm is a great way to beef up your deck. While game time does progress when you’re inside a Dungeon, the Ruler won’t pull you out if you exceed the 72 hours, so you can get some extra resources by running the Dungeons at the end of the Realm timer.
Occasionally, an Ash Storm will occur, depositing card Recipes and Ash Chalices within a few tiles of your player. This will disappear after three “hours,” so you can usually only reach one. The Recipes are almost always the right choice here – the Chalices contain very small amounts of Ash, and the Recipes can at least be sold for Gold to the Merchant if you don’t intend to craft that card.
Each tile has an environment associated with it – this is only relevant when the tiles are either available to be extracted for resources, or in battle. Each kind of environment is associated with one of the NPC resources, and those environments have a different status effect in battle. Some of the effects are pretty standard – in Towns humans have a 5% increase to critical chance, and in Graveyards undead monsters heal 2 hp per turn. My favorite one is the effect for the Shore – the Sea Wave. Every five turns, there’s a chance a Fish Egg will wash up in to the battle, or the sea monsters you’re fighting will get slightly healed, or that even a fully emerged sea monster will join the fight. It’s a great race-against-the-clock mechanic, but it’s yet another thing to keep track of in the midst of an incredibly saturated battle system.
Mechanics, Part 2 – The Battles
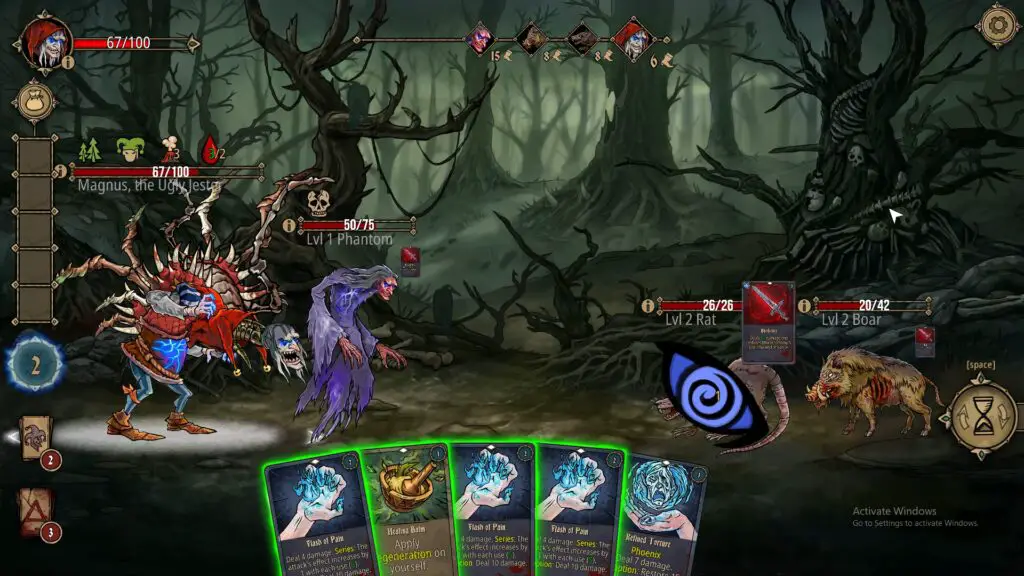
Battles in DoA use the cards you’ve collected and crafted over the course of the game. Each participant in battle (your player character and each distinct monster you face) has their own individual Speed stats, which determine the turn order. You have 5 mana points which you use to cast your cards, which then refill at the beginning of your next turn. At the end of your turn, you have the option of selecting up to three cards to be sent back to the bottom of your Battle Deck – you don’t discard your hand at the end of the turn. In your next turn, you’ll draw up to your full hand size of 6 cards, and if you don’t have enough cards in your BD to fill your hand, an Ash Pact card will be created. While you only draw up to 6 cards at the start of your turn, your maximum hand size is actually 10, so Draw effects played early in a turn won’t waste cards. You win battles by killing the monsters before they kill you – which can be hard, because a lot of these baddies hit like a truck. Thankfully, you can tell what a monster will do on its turn by hovering over the small card icon under its health bar. It’s not as elegant as the interface of some genre-competitors, but it allows the monsters in DoA to have much more complicated effects and interplay.

Health restoration is surprisingly common in DoA – every character starts their run with a Healing Balm card, and there are cards with healing effects incorporated into each character’s card set. I’ve found that prioritizing long-lasting, small-numbers regeneration effects can be very helpful, as the Bleed and Poison damage-over-time types each have their effect weakened every time your character restores HP.
The core struggle of battles in DoA is all about knowing when to invest your health in to your Ash Pact to renew cards from your Ash Deck back to your Battle Deck – and if you build a deck with lots of cards that are hard to get out of your hand, either because they have a high mana cost or they’re literally “Non-Playable,” you can end up in a situation where you can’t ever draw your BD to zero to spawn that Ash Pact card. If you’re playing a deck heavy in Ash cards, rushing your Ash Pact might really screw over the rest of your fight. The Ash Pact is a required gamble, and it’s a solid thrill every time you use it.
The most solid thrill is after you’ve won a battle, and you’re faced with the Tent screen. You are offered a small number of Rest Points, which you can either use to renew individual cards back to your BD, or to heal yourself. This is good, exciting decision-making: do you want to start the next battle with a sturdy deck, or full health? Which cards are worth compromising on in order to get a few more HP back? Or, are you so low on both BD cards and health, that you’re going to spend the time it takes to make it all the way back to Camp to have your cards renewed for free? This mechanic is where the horror vibe really clicks for the game.
Some un-solid thrills, however, come in the form of a Dodge Chance stat for the monsters. Non-deterministic variables in a game otherwise full of them never feels great, and watching your well-planned last-ditch combo whiff because of a random Dodge sucks. This is also a big reason I never really got the hang for Lucia, the Pyromancer – a few of her big Ash cards only give you a percentage chance of a successful effect, so I never found them to be worth the investment.
The worst feeling in fights in DoA is when an opponent’s high Speed means it starts before you, firing off its ability immediately upon loading from the overworld into the battle, and suddenly you’re missing 40 HP and you’ve got a weird debuff. Speed as a mechanic is otherwise fine, but this particular scenario occurs way more often than it should, especially in a game without an action log.
Speaking of mechanics, let’s talk about their hotbeds: the characters. Each of the four characters in Deck of Ashes was a member of the band of outcasts who ventured into the Valley of Death to claim the Ash Box from Lady Death – a boon she was willing to give freely. However, under the effect of psychic strife set upon them by Magnus the Jester, the other three outcasts fell to in-fighting while Magnus claimed the Ash Box for himself. The Ash Box overpowered Magnus and shattered, unleashing the mutating Ash Curse upon the land.
You can play as either Lucia, a self-destructive flame wizard – Sly, a cunning rogue haunted by ghosts – Buck, a beefy mercenary accompanied by a mythical beast – or Magnus, a horrifying shapeshifting jester. Each character has their own set of cards, with mechanics and archetypes unique to them. Notably, all of the characters have significant access to damage-over-time mechanics.
Lucia has one main DoT type (Burn), and no unique character mechanics, but she does have access to a debuff no other characters do: Pyrobomb. Lucia’s card archetypes include various cards that apply and trigger Pyrobomb, stacking Burn effects and punishing monsters based on how many Burns are in play, and discarding her hand for significant amounts of damage. She also has a set of non-playable “scroll” cards which each have Ash effects, making good fodder for her discard-based cards.
Sly has two main DoT types (Bleed and Poison), with a unique mechanic of getting one chance per battle to create a Shadow Assistant to tank a hit for him. Sly is also haunted by the ghost of his wife who was killed by nobles, who occasionally grants one of three buffs, and the ghosts of the nobles Sly killed as revenge, who occasionally grant him one of three debuffs. Sly’s archetypes include building his speed stat and doing damage based on it, using lots of cheap hits to build Bleed damage, creating cards out of thin air from the other character’s sets, and making himself impossible to hit with “Stealth”.
Buck has two main DoT types, Bleed and “Inflammation,” a DoT type unique to him. Buck’s main gimmick revolves around Charon, a fuzzy little creature that Buck found in some enchanted woods. As Buck does damage to monsters, he gains Rage Points, which increase damage done using “strike” cards. When he hits certain thresholds of Rage Points an effect triggers depending on which collar is equipped on Charon, and Buck gains a point of “Battle Rush.” Many of Buck’s cards have an additional effect when played with a Battle Rush point available, and will consume the point after being played. Buck is also the only character with “Mark” cards – these apply a debuff to an opponent that usually interacts with Buck’s Ash cards, which are mostly representations of Charon’s participation in the battle. Buck’s archetypes include heavy Inflammation buildup, gaining Shields, and doing immense amounts of damage.
Magnus has one main DoT type, Poison, and, uh… a whole bunch of unique mechanics. The main character mechanic is that every three turns, he shapeshifts into a new form, either becoming a big rocky demon thing, a freaky spider monster, or turning back into his regular jester form. Each of these come with a buff to the cost of certain cards, at the drawback of limiting healing, card draw, or taking damage when the Phantom dies. Oh, you haven’t met the Phantom? Magnus is the only character who can summon a monster to fight with him, who deals out some heavy hits at the cost of losing 25 health each turn.
Magnus’s card archetypes include cards that overwrite what a monster was planning on doing, often making the monster hurt itself or its team, summoning the Phantom and giving it new abilities, or applying Curses, which reduce enemy stats, and then dispelling the curses to do big damage. Magnus is also the only character with “Eruption” cards, which have a special effect when they’re the fourth “Eruption” card to be played. Magnus is the most complicated character, but he’s also the most fun – partially because between having a summonable ally, powerful Eruption effects, and being able to manipulate monsters, he’s incredibly powerful. I was able to steamroll the first chapter of the game with Magnus without crafting any new cards.
Mechanics, Part 3 – Resources and Camp
So we’ve covered the world and its resources, and we’ve talked about the characters who set out to get them. So now we have to ask – what do we do with all this junk?
The resources you gather from Resource Points – Goblets, Relics, Herbs, and Ores – each correspond to, and upgrade, one of the four NPCs who live in Camp. Goblets unlock new capabilities at the Merchant, Relics at the Ash Master, Herbs at the Herbalist, and Ores at the Blacksmith. Each upgrade in an upgrade tree requires 4, then 8, then 12 of the respective resource.
Here’s the problem – these resources simply do not matter until the end of the game. The main resource in DoA is Ash, and it is in very short supply. The most viable way to build your strength and get through Chapter 1 is to ignore everything that isn’t a Battle and chase that Ash. Ash is the only numeric resource you need to craft cards, apart from Recipes – and you get Recipes from Chests, which you unlock with keys, which you get from battles, which you’re doing anyway because you need Ash. Perfect loop. You should expect to use every piece of Ash you find over the course of the game.
You can also buy Recipes from the Merchant using Gold, which you’re also collecting from battles – and the only way to get healed in Camp is to pay Gold to the Herbalist, so that loop is nice and closed too. If you just want to get strong, you can totally ignore the other resources.
But, if you want to be perfect, then you’ll need to collect some Herbs, Ore, and Goblets. Herbalist upgrades allow you to buy permanent stat boosts, remove Ailments (permanent debuff cards some monsters will slip in to your deck), and get a discount on healing. Blacksmith upgrades allow you to buy “Traits” and dismantle cards you don’t want in your deck anymore. Merchant upgrades expand his wares, allow you to exchange NPC resources, and, the most important one, increase the number of Rest Points available in the Tent after a battle. Ironically, the Ash Master – arguably the narrator of the game – has pretty middling upgrades, and I feel like the Rest Point upgrades should really belong on him. But, if we’re talking about perfect here, you can upgrade his Resurrection Rite – an expensive buff that allows you to return from the dead if slain, but leaving all of your resources and recipes behind.
If you’re thinking to yourself “Hey, those all sound pretty good, why do they only matter at the end of the game?,” my answer is this: it’s simply not worth having a perfect deck until Chapter 3. If you want to make it through the deeply challenging Ruler fights in Chapters 1 and 2, you’re going to have to spend as much time as you can getting better cards so you don’t have to be damaging yourself to renew from your Ash Deck. By the beginning of Chapter 3, your deck is probably pretty reliable and you should be able to hold your own in the bountiful areas of the Realm without too much concern, able to gather resources and return to camp to refine your deck for the final two boss fights with ease.
The Badlands, or, The Goodlands
The card sets for each character, the kinds of puzzle each monster creates, and the overall mechanical interplay for the card-battle component of Deck of Ashes is really solid. If you only want to engage with that part of the game, I have excellent news: that game mode exists as “The Badlands.”
In the Badlands, you start the game with your initial set of cards, and once you leave camp you must pick one of three paths to travel down. The leftmost path is the easiest, with the difficulty increasing to a middle path and a hard path on the right. There’s no backtracking in the Badlands – but if you decide you want to switch paths, there’s a portal about halfway along.
The focus here is just on the battles – the upgrades you can imagine wanting from the NPCs are already unlocked, so you don’t have to worry about collecting their resources. Everything is paid for with Ash or Gold – but Ash doesn’t have too much use in the Badlands, as you unlock a complete card after every battle and within every chest. If this sounds familiar, it’s because it’s a very close approximation of the way Slay the Spire’s map works – and that’s okay. It allows the mechanical complexity and ingenuity going on inside the card sets and characters to really shine through, and strips away all the stuff I found frustrating or poorly designed with the Campaign. I almost forgot to play the Badlands for this review, but after running through it with Lucia it really sold me on DoA and it’s got me excited to try it again.
Heat of the Flame
DoA does a few things I really love, namely the Ruler and Dungeon Lord fights that play like puzzles. The Black Knight, the Keeper of Deals, and the Spirit Guide are all really fun puzzle monsters that kept me engaged in the battle, instead of just trying to pull off my deck’s combos. The smaller monsters with kits that challenge you to rethink your damage priorities are also really satisfying, like the crab that reflects every third hit, demanding you stack DoT on him and then leave him alone.
The environment system for the Battle tiles is really fun, and I’d love to see more games do things like this. It helps each monster feel like it actually lives in the place you’re battling it, and while the position of each tile environment isn’t always internally logical, it helps a string of battles feel distinct from each other.
The actual card sets are really fun to play with, as stated above. A lot of thought clearly went into making each archetype unique, and for the most part they all feel fun to play with. I’m excited to play more Badlands and get to play each archetypal deck as it was intended.
This review wouldn’t be complete without a specific shout-out to the voice actors for Ash Master and Magnus. Ash Master’s voice is the perfect fit for a spooky shaman, and he plays the mysterious guide so well. Magnus’s voice actor is working his butt off, bringing huge insane villain energy to the character. His narration is so much fun to listen to, and he’s clearly having a lot of fun doing it.
Covered in Ash
Unfortunately, DoA is simply lacking the polish it needs to be a great game. A significant amount of my review notes just reads like a quality assurance report: sometimes controller button graphics display over other text even though I don’t have a controller plugged in. There isn’t a glossary of status effects. The Trauma debuff – which reduces the mana cost of Strike cards when aimed at the debuffed enemy – doesn’t actually work if you don’t have the mana for the original cost available. Boss chests say they’ll give you two card recipes but only give you one. Weird performance inconsistencies. There’s a bug that stops you from upgrading NPCs that’s been in the game since June of 2020. A debuff that is supposed to affect the Ash cost of card-crafting by 30% is actually affecting it by 300%. Quality of voice-acting aside, sometimes the sound mixing on Buck’s voice is so low it cuts out his consonants. The English translation of the original Russian text really starts to fall apart during cutscenes near the end of each character’s story, and the English-speaking actors just have to muscle through it.
Beyond lack of polish, though, there are some outright bad design decisions. One of them is one of the two debuffs that you can incur when inside a Dungeon: “At the start of battle, 50% chance of losing your trait.” Traits are a huge investment of Gold, and for Buck, Traits are how his Battle Rush mechanic gets triggered. Playing Buck through that dungeon was like having my whole deck thrown out the window, unable to use the mechanics his card set is built on. This trait-removing debuff comes back during the fight against Octavius, for the sheer purpose of making it numerically harder – which is really too bad, because some of the other boss and miniboss fights make for such excellent puzzles.
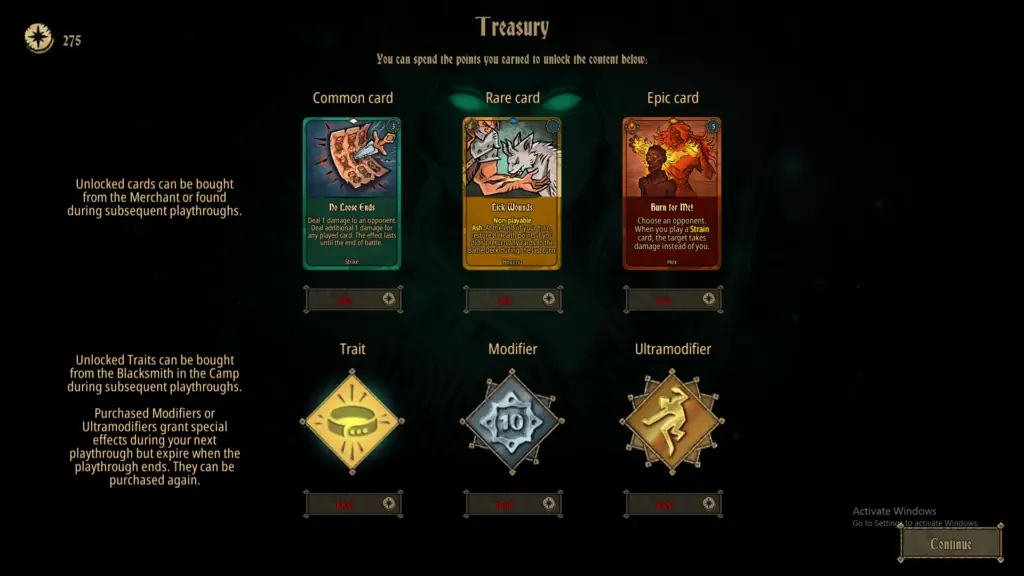
At the end of every run, depending on a variety of metrics, you’ll be rewarded with an amount of Reward Points you can use to spend on unlocking cards that will appear in future runs. You can also unlock “Modifiers” and “Ultramodifiers,” which change some property of the game. For some reason, both Modifiers and Ultramodifiers only last for one run, and they’re both a very significant investment of Reward Points. I think they would add a lot more replay value if they functioned more like the Artifacts from Risk of Rain – permanent switches that allow you to significantly change how the game operates, often by simply throwing numerical values well outside their original ranges. Something like that would fit in well here, and treat the player’s time more fairly.
Dust to Dust
Deck of Ashes has a solid – but sprawling – mechanical engine, a delightfully spooky art direction, and big dreams – which unfortunately fall short due to an excess of choices that don’t really matter, and a significant lack of polish and love. If you’re a huge fan of this genre and you’re desperate to play with a new set of cards, you might find it to be worth your time and money. Otherwise, I suggest you skip Deck of Ashes until it receives the work it needs to shine.